


本文结构
在微服务架构的部署拓扑中,比较常见的做法是将身份认证中心(Identity Authority)与其它的微服务一起,置于API Gateway之后,由API Gateway提供统一的端点供客户端程序访问。本文介绍如何将IdentityServer4配置在nginx之后,通过nginx为Blazor WebAssembly提供认证服务。部署拓扑大致如下:
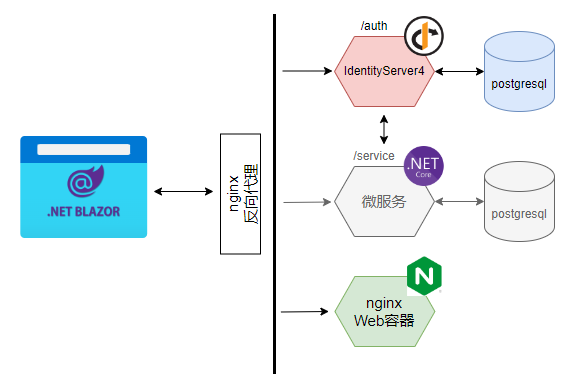
在上图中:
- 身份认证中心IdentityServer4配置在/auth的路由下,所有的资源和API端点均通过localhost/auth路径访问
- 微服务配置在/service的路由下,并通过内部网络访问IdentityServer4以验证token,本文不涉及微服务配置的相关内容,故上图中标为灰色
- nginx Web容器提供Blazor WebAssembly的静态资源
- 浏览器通过nginx反向代理,从nginx Web容器下载Blazor WebAssembly资源,运行Web Assembly应用,并使用部署在/auth路径下的IdentityServer4服务实现身份认证与授权(授权暂不介绍)
IdentityServer4的配置
如果兼顾在Visual Studio中对项目进行调试,以及直接在docker中运行整个软件系统两种场景的话,则需要在IdentityServer4中实现两套OIDC Client模型,然后在Blazor WebAssembly中,根据当前环境是开发环境还是生产环境来决定选用哪个Client。比如,下面的两个Client模型,除了ClientId和跳转的URL不同之外,其它的配置都是相同的:
new Client
{
    ClientId = "webApp",
    AllowedGrantTypes = GrantTypes.Code,
    RequirePkce = true,
    RequireClientSecret = false,
    AllowedCorsOrigins = { "https://localhost:9200" },
    AllowedScopes =
    {
        IdentityServerConstants.StandardScopes.OpenId,
        IdentityServerConstants.StandardScopes.Profile,
        "management.read",
        "management.create"
    },
    RedirectUris = { "https://localhost:9200/authentication/login-callback" },
    PostLogoutRedirectUris = { "https://localhost:9200/authentication/logout-callback" }
},

new Client
{
    ClientId = "webAppProd",
    AllowedGrantTypes = GrantTypes.Code,
    RequirePkce = true,
    RequireClientSecret = false,
    AllowedCorsOrigins = { "https://localhost" },
    AllowedScopes =
    {
        IdentityServerConstants.StandardScopes.OpenId,
        IdentityServerConstants.StandardScopes.Profile,
        "management.read",
        "management.create"
    },
    RedirectUris = { "https://localhost/authentication/login-callback" },
    PostLogoutRedirectUris = { "https://localhost/authentication/logout-callback" }
}
其次,由于IdentityServer4会被配置在/auth子路由下,因此,我们需要在IdentityServer4项目自动生成的HostingExtensions类的ConfigurePipeline方法中,处理/auth的路由映射:
var fordwardedHeaderOptions = new ForwardedHeadersOptions
{
    ForwardedHeaders = ForwardedHeaders.XForwardedFor | ForwardedHeaders.XForwardedProto,
    ForwardLimit = 2
};
fordwardedHeaderOptions.KnownNetworks.Clear();
fordwardedHeaderOptions.KnownProxies.Clear();
app.UseForwardedHeaders(fordwardedHeaderOptions);
app.Map("/auth", app =>
{
    app.UseSerilogRequestLogging();
    app.UseStaticFiles();
    app.UseRouting();
    app.UseIdentityServer();
    app.UseAuthorization();

    app.UseEndpoints(endpoints =>
    {
        endpoints.MapControllerRoute(
            name: "default",
            pattern: "{controller=Home}/{action=Index}/{id?}");
        endpoints.MapRazorPages().RequireAuthorization();
    });
});
当然,这部分代码也是在生产环境中,当IdentityServer4认证服务运行于容器中时,才需要做这样的处理,所以,可以使用WebApplication.Environment.IsProduction()方法来判断是否处于生产环境。更进一步,我们可以将/auth子路由的名字作为环境变量进行设置,以便在部署中可以根据需要选择这个子路由的名称(当然,这是需要跟nginx的配置进行搭配的)。
Blazor WebAssembly的配置
在Blazor WebAssembly的wwwroot目录下,有一个appsettings.json文件,它其实与ASP.NET Core Web API类似,可以根据不同的环境对相同的环境变量设置不同的值。同样,当Blazor WebAssembly编译后在容器中运行时,其所在的环境也是生产环境,因此,我们在appsettings.Production.json文件中,对oidc进行配置:
"oidc": {
  "Authority": "https://localhost/auth",
  "ClientId": "webAppProd",
  "ResponseType": "code",
  "DefaultScopes": [
    "openid",
    "profile"
  ],
  "PostLogoutRedirectUri": "authentication/logout-callback",
  "RedirectUri": "authentication/login-callback"
}
可以看到,这里的ClientId需要使用IdentityServer4中对应的ClientId,以便使用正确的跳转路径。当然,可以在appsettings.Development.json文件中,针对调试环境进行配置,使其在Visual Studio调试时也能正常工作。除此之外,WebAssembly不需要做额外的配置,认证与授权这一部分就按照微软官方文档做就可以了。
nginx Web容器的配置
在Web容器中,Nginx的配置如下:
events {
  worker_connections 4096;
}

http {
  server {
    listen                  80;
    listen                  [::]:80;
    server_name             localhost;
    include                 /etc/nginx/mime.types;

    location / {
        root /usr/share/nginx/html;
        try_files $uri $uri/ /index.html    =404;
    }
  }
}
在Blazor WebAssembly的Dockerfile中,会将WebAssembly的编译结果输出到/usr/share/nginx/html目录中:
FROM nginx:1.23.3-alpine AS base
WORKDIR /usr/share/nginx/html
EXPOSE 80

FROM mcr.microsoft.com/dotnet/sdk:7.0 AS build
WORKDIR /src
COPY ["Booking.WebApp/Booking.WebApp.csproj", "Booking.WebApp/"]
RUN dotnet restore "Booking.WebApp/Booking.WebApp.csproj"
COPY . .
WORKDIR "/src/Booking.WebApp"
RUN dotnet build "Booking.WebApp.csproj" -c Release -o /app/build

FROM build AS publish
RUN dotnet publish "Booking.WebApp.csproj" -c Release -o /app/publish

FROM base AS final
COPY Booking.WebApp/nginx.conf /etc/nginx/nginx.conf
WORKDIR /usr/share/nginx/html
COPY --from=publish /app/publish/wwwroot .
CMD ["nginx", "-g", "daemon off;"]
nginx反向代理的配置
在nginx反向代理中,需要配置所有对/auth及其子路径的访问,都被路由到IdentityServer4的服务上:
location ~ ^/auth/(.*)$ {
  proxy_http_version 1.1;
  rewrite ^ $request_uri;
  rewrite ^/auth/(.*)$ $1 break;
  proxy_pass http://identity-server/auth/$1;

  proxy_set_header Upgrade $http_upgrade;
  proxy_set_header Connection keep-alive;
  proxy_set_header Host $http_host;
  proxy_set_header X-Real-IP $remote_addr;
  proxy_set_header X-Forwarded-For $proxy_add_x_forwarded_for;
  proxy_set_header X-Forwarded-Proto $scheme;
  proxy_cache_bypass $http_upgrade;
}
# ...
upstream identity-server {
  server booking-auth-service:9001;
}
当然,当用户访问根路径时,nginx反向代理需要将请求转发到nginx Web容器上:
location / {
  proxy_pass http://booking-web;
}
# ...
upstream booking-web {
  server booking-web:80;
}
在开发一个软件系统的时候,当开发人员需要调试前端代码的时候,往往都会直接将后端服务运行起来,然后使用调试工具对前端代码进行调试,也就是说,在这种场景下,nginx反向代理以及部署于其后的IdentityServer4会直接运行起来,然后前端的Blazor WebAssembly则在调试环境中运行,于是,nginx反向代理和WebAssembly将会运行在不同的端口上(比如nginx反向代理侦听80端口,而在Visual Studio中调试的WebAssembly则运行在9002端口上),其造成的结果是,两者并不同源。IdentityServer4的认证流程是需要Cookie支持的,而在新版本的浏览器中,非同源的Cookie访问是需要HTTPS支持的(也就是需要启用SSL)。下面简要介绍一下如何在nginx上配置并启用SSL。
生成自签证书
在实际生产环境中,应使用认证机构颁发的证书,但此处为了测试,可以使用自签证书来完成系统配置。生成自签名证书过程如下:
- 使用文本编辑器,新建一个名为csr.txt的文件,内容类似如下:
[req]
default_bits = 2048
prompt = no
default_md = sha256
req_extensions = v3_req
distinguished_name = dn
x509_extensions = v3_ca

[ dn ]
C=CN
ST=Shanghai
L=Shanghai
O=localhost
OU=localhost
emailAddress=abc@localhost.com
CN = localhost

[ v3_req ]
basicConstraints = CA:FALSE
keyUsage = digitalSignature, nonRepudiation, keyEncipherment

[ v3_ca ]
subjectKeyIdentifier   = hash
authorityKeyIdentifier = keyid:always,issuer:always
subjectAltName         = @alt_names
issuerAltName          = issuer:copy

[ alt_names ]
DNS.1 = localhost
DNS.2 = localhost.com
DNS.3 = booking.daxnet.com
- 使用openssl命令创建私钥:
openssl genrsa -des3 -out localhost.key 2048
openssl rsa -in localhost.key -out localhost.key
- 创建证书签名请求:
openssl req -new -out localhost.csr -key localhost.key -config csr.txt -extensions v3_ca -extensions v3_req
- 创建证书:
openssl x509 -req -in localhost.csr -signkey localhost.key -out localhost.crt -days 3650 -extfile csr.txt -extensions v3_req -extensions v3_ca
- 可以使用下面的命令查看证书:
openssl x509 -in localhost.crt -noout -text
至此,会产生一个名为localhost.key的私钥文件,以及一个名为localhost.crt的证书文件。
在nginx上配置SSL
可以使用下面的设置,在nginx上配置SSL:
http {
  server {
    listen 443 ssl;
    server_name         localhost;
    ssl_certificate     localhost.crt;
    ssl_certificate_key localhost.key;
    ssl_protocols       TLSv1 TLSv1.1 TLSv1.2;
    ssl_ciphers         HIGH:!aNULL:!MD5;
    # ...
  }
}
有关nginx中配置SSL的详细信息,请参考官方文档:http://nginx.org/en/docs/http/configuring_https_servers.html
将自签证书安装到系统中
自签证书需要安装到系统中,才能被浏览器所使用。不同的操作系统下,证书安装方式不同,在Windows上,双击证书文件即可将生成的自签证书导入系统中,直接在图形界面上一步步操作即可。在Ubuntu Linux下,可以使用下面的命令完成证书安装:
sudo cp localhost.crt /usr/share/ca-certificates && sudo update-ca-certificates
演示与源代码
参考下面的演示视频:

源代码如下:
https://github.com/daxnet/booking/tree/nginx-proxied